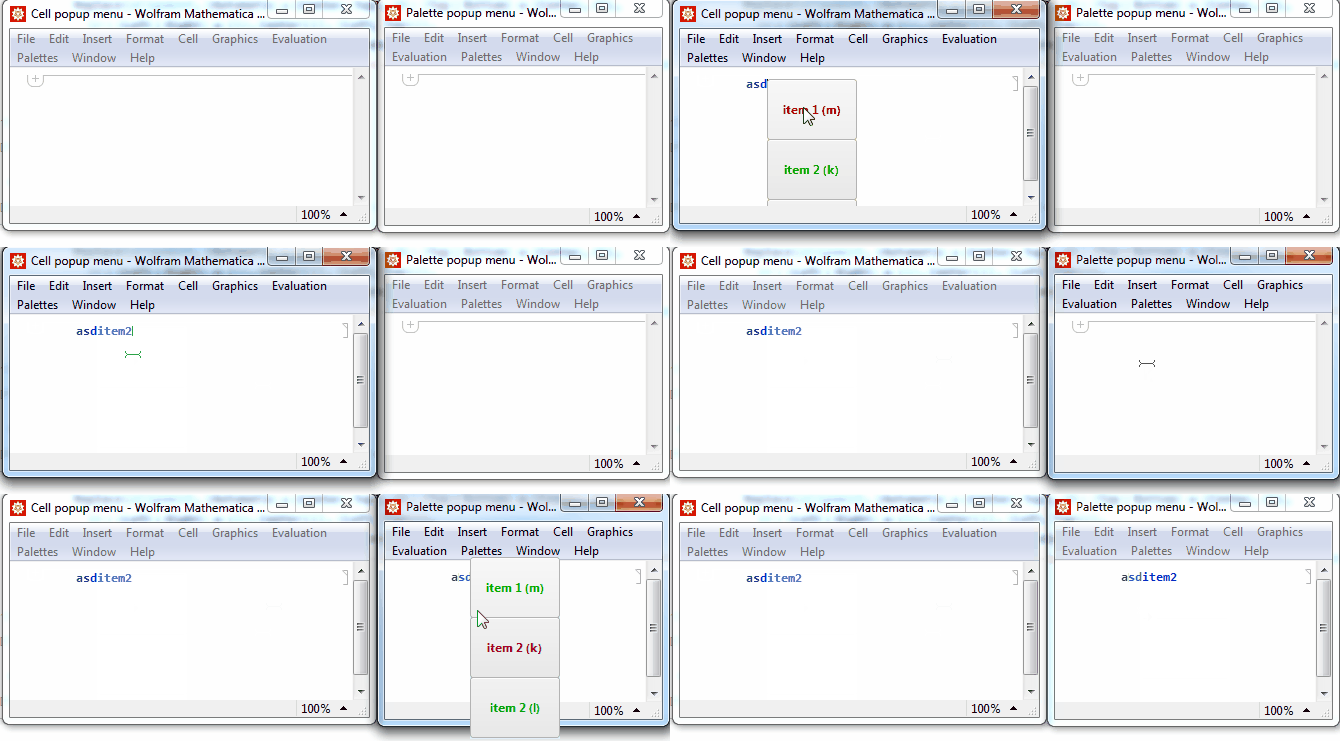
Edit
Once again b3m2a1 provided more detailed information about a FE's feature so I have to retract my claim that it is not worth an effort to create a popup on cursor position as opposed to e.g. in the corner of the notebook.
Main
The following answer is closely related to Live code templates I'm working on in a free time.
I will outline two alternative methods, attached cell vs frameless palette. (the linked topic uses the former one but without attaching on a cursor position)
tl;dr;
Make sure you saved your work, this is a rough implementation and the "Cell" approach uses an undocumented AttachedCell.
This one is not on cursor position because it is tough :) this one is:

Cell vs. Palette
Palette is not clipped by a parent notebook what is very convenient when the cursor is close to the bottom/right edge or the menu is not small.
Palette notebook is documented
AttachedCell can be placed directly on a cursor position, thanks to an UndocumentedGetSelectionPacket. It is not easy with Palette because Undocu... does not account on DockedCells and additionaly we need to do WindowMargins arithmetic.
Cursor position
FrontEndExecute @ FrontEnd`UndocumentedGetSelectionPacket @ InputNotebook[]

its "VirtualSelectionRectangle" value is a cursor position with respect to the bottom left edge of the very bottom docked cell (or a nb menu).
Key events
Whatever wrapper you use the key point is to create a DynamicModule that will temporarily overwrite parent notebook's NotebookEventActions on Initialization and will revert old settings on Deinitialization (you thought you will never use this opition, didn't you?).
Once Arrows/Enter/Esc are overwritten there is no problem in "KeyDown" event and check if an event key isn't a member of defined shortcuts.
Demo code
CenterToParent is taken from How to center a dialog with respect to a parent notebook
testPopup[type:"Cell"|"Palette":"Cell"]:=CreateDocument[{}
, WindowTitle -> type <> " popup menu"
, StyleDefinitions -> Notebook[{
    Cell[StyleData[StyleDefinitions -> "Default.nb"]]
  , Cell[StyleData["Notebook"]
    , NotebookEventActions -> {{"MenuCommand", "InsertNewGraphic"}:>openPopup[type]} (*Ctrl+1*)
    ]
  }]
];

items = {
<|"lbl"->"item 1","action":>NotebookWrite[InputNotebook[], "item1"],"shortkey" -> "m"|>,
<|"lbl"->"item 2","action":>NotebookWrite[InputNotebook[], "item2"],"shortkey" -> "k"|>,
<|"lbl"->"item 2","action":>NotebookWrite[InputNotebook[], "item3"],"shortkey" -> "l"|>
};


openPopup["Palette"]:= NotebookPut @ CenterToParent @ Notebook[
  List @ Cell[BoxData @ ToBoxes @ popupMenu["Palette"]
  , CellFrameMargins->{{0, 0}, {0, 0}}
  , CellMargins->{{0, 0}, {0, 0}}
  ]
, StyleDefinitions->"Dialog.nb"
, WindowClickSelect->False
, WindowFloating->True
, WindowFrame->"Frameless"
, WindowSize->All
, Background->LightBlue
, WindowElements->{}
, WindowFrameElements->{}
];

openPopup["Cell"] := Module[{sel,fromTop, fromLeft}
, Catch[
    sel = FrontEndExecute@FrontEnd`UndocumentedGetSelectionPacket@
      InputNotebook[]
  ; If[
      MatchQ[sel, KeyValuePattern[{"CellSelectionType" -> "ContentSelection", "SelectionType" -> "CursorRight"}]]
    , {fromLeft,fromTop} = Lookup[sel, "VirtualSelectionRectangle", {{0,0},{0,0}}][[All, 1]]
    , Beep[];Throw@$Canceled
    ]
  ; MathLink`CallFrontEnd[
      FrontEnd`AttachCell[
        EvaluationNotebook[]
      , Cell @ BoxData @ ToBoxes @ popupMenu["Cell"]
      , {Offset[{-fromLeft,-fromTop},0], {Left,Top}}
      , {Left,Top}
      , "ClosingActions"->{ "OutsideMouseClick" }
      ]
    ]
  ]
];

popupMenu[type_]:=DynamicModule[
  {item=1,thisObject, parentObject, menuClose, items = items, itemsLength = Length@items}
, Table[With[{i=i},
   EventHandler[#, "MouseEntered":>(item = i)]& @ Button[
     Style[
     StringTemplate["`lbl` (`shortkey`)"]@items[[i]], Bold, FontColor-> Dynamic@If[item==i,Darker@Red,Darker@Green]]
   , items[[i,"action"]]; menuClose[]
  , FrameMargins->15
   , ImageMargins->0
   , Appearance->FrontEndResource["FEExpressions","GrayNinePatchAppearance"]
   ]]
  , {i, itemsLength}
 ]//Column[#,Spacings->0]&
 , Initialization:>(
   If[
     type === "Palette"
   ,
     thisObject = EvaluationNotebook[];
     menuClose[]:=NotebookClose @ thisObject
   ,
     thisObject = EvaluationCell[];
     menuClose[]:=NotebookDelete @ thisObject
   ];
   parentObject = InputNotebook[];


   CurrentValue[parentObject, NotebookEventActions] = {
     "UpArrowKeyDown":>(item=Mod[item-1,itemsLength,1])
   , "DownArrowKeyDown":>(item=Mod[item+1,itemsLength,1])
   , "EscapeKeyDown":>menuClose[]
   , "ReturnKeyDown" :> (items[[item, 2]]; menuClose[])
   , "KeyDown" :> If[
       MemberQ[items[[;;, "shortkey"]], CurrentValue["EventKey"]]
     , (#action& /@ Select[items, #shortkey === CurrentValue["EventKey"]&]);menuClose[]
     ]
   , "MouseClicked" :>  menuClose[]
  }
)
 , Deinitialization:>(
  CurrentValue[parentObject,NotebookEventActions]=Inherited
)
]


CenterToParent::usage =  "CenterToParent[DialogInput[...]] etc, will make the dialog centered with respect to the parent notebook";

CenterToParent // Attributes = {HoldFirst};

CenterToParent[ dialog_[whatever__, opts : OptionsPattern[]]  ] := With[
    {apc = AbsoluteCurrentValue}
  , With[
        { parentCenter = Transpose @ {
              apc[WindowMargins][[;; , 1]] + .5 apc[ WindowSize]
            , {Automatic, Automatic}
          }
        }
      , dialog[
            whatever
          , NotebookDynamicExpression :> Refresh[
                SetOptions[
                    EvaluationNotebook[]
                  , WindowMargins -> (parentCenter - Transpose[{.5 apc[WindowSize], {0, 0}}])
                  , NotebookDynamicExpression -> None
                ]
              , None
            ]
          , opts
        ]
     ]
  ];


