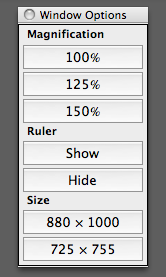
For various reasons, mostly connected to poor eyesight, I frequently want to change window size and magnification. To make this convenient, I have built a palette that has buttons to set these frequently used options. It might help you too. Here is the code ...
With[{setMag = (CurrentValue[InputNotebook[], Magnification] = #) &},
  CreatePalette[
    Framed@Column[{
      Style[" Magnification", Bold, 11],
      Button["100%", setMag[1.], Appearance -> "Palette", ImageSize -> 120],
      Button["125%", setMag[1.25], Appearance -> "Palette"],
      Button["150%", setMag[1.5], Appearance -> "Palette"],
      Style[" Ruler", Bold, 11],
      Button["Show",
        With[{wtb = CurrentValue[InputNotebook[], WindowToolbars]},
          CurrentValue[InputNotebook[], WindowToolbars] =
            DeleteDuplicates@Flatten[{wtb, "RulerBar"}]],
        Appearance -> "Palette"],
      Button["Hide",
        With[{wtb = CurrentValue[InputNotebook[], WindowToolbars]},
        Switch[wtb,
         "RulerBar", CurrentValue[InputNotebook[], WindowToolbars] = {},
         _List, CurrentValue[InputNotebook[], WindowToolbars] =
           DeleteCases[wtb, "RulerBar"]]],
        Appearance -> "Palette"],
      Style[" Size", Bold, 11],
      Button["880 \[Times] 1000",
        CurrentValue[InputNotebook[], WindowSize] = {880, 1000},
        Appearance -> "Palette"],
      Button["725 \[Times] 755",
        CurrentValue[InputNotebook[], WindowSize] = {725, 755},
        Appearance -> "Palette"]}],
    WindowTitle -> "Window Options"]];
... and here is how it looks when deployed.

To install the palette, evaluate the code, select Install Palettes... from the Palettes menu, and complete the ensuing dialog box. After installation the new palette will appear in the Palettes menu.
Note: You will probably get an alert asking to save the palette as a notebook, even after installation. Just ignore it -- the installation process saves the palette to the correct directory.

