Found better way
Source Link
jmlopez
  • 6.5k
  • 4
  • 28
  • 48

You could also use the AlignmentMaker\[AligmentMarker] character. They have a tutorial in which they show one example that mightTo help you get things aligned. Sobetter write equations, to show how to getlets forget about the latex sample thatDisplayFormula style and lets create our own.

#Set up:#

Let us create the style DisplayMath. In your notebook where you show inare writing your postdisplayed equation go to Format > Edit Stylesheet.... Here you can startwill create a new cell. Show the expression of the cell by using thisgoing to Cell > Show Expression or by pressing commandshifte in a mac. Now enter the following in that expression:

TraditionalForm[Cell[StyleData["DisplayMath"],
    HoldForm[ConversionRules->{
        Row["TeX" -> {"$$\n", Convert`TeX`BoxesToTeX[#]& , "\n$$"}, 
        "HTML" -> {"$$\n", StringReplace[Convert`TeX`BoxesToTeX[#], {"<" -> " \\lt ", ">" -> " \\gt "}]& , "\n$$\n\n"}
   Column[{0 }, 
 (t - Subscript[x, min])/(Subscript[xDefaultFormatType->TraditionalForm, 
 max] - Subscript[x TextAlignment->Center, 
 min])   LanguageCategory->"Formula", 
 1}]   AutoSpacing->True,
    ScriptLevel->0,
    AutoMultiplicationSymbol->False,
    "SingleLetterItalics->True, 
    "SpanMaxSize->Infinity,
    CounterIncrements->"DisplayMath",
    Column[{tFontFamily->"Times",
 <=\[AlignmentMarker] Subscript[x  FontSize->16, 
 min]   ShowInvisibleCharacters->All, 
 Subscript[x   UnderoverscriptBoxOptions->{LimitsPositioning->False}, 
 min] <= t <=\[AlignmentMarker]GridBoxOptions->{
 Subscript[x, max], t GridBoxAlignment->{
 \[AlignmentMarker]Subscript[x, max]      "Columns" -> {{"\[AlignmentMarker]"}}, Alignment"ColumnsIndexed" -> "\[AlignmentMarker]"]{}, 
        "Rows" -> {{Baseline}]}, "RowsIndexed" -> {}}
    ]}
]

The alignment markerThis is invisible by defaultthe style that I'm using to display mathematics. You can set themNotice the use of ShowInvisibleCharacters, this makes the \[AligmentMarker] to be displayed with

SetOptions[$FrontEnd, ShowInvisibleCharacters -> All]

And. If you do not wish for this to be displayed when you print or in a presentation then turn it off when you use another environment. You do so by creating a cell with these contents:

SetOptions[$FrontEndCell[StyleData["DisplayMath", ShowInvisibleCharacters"Printout"],
 -> None]  ShowInvisibleCharacters->None
]

The idea hereoption GridBoxOptions simply say that the grids in this style will be aligned using the \[AlignmentMarker]. Now lets type some math.

#Writing Aligned Equations:#

Start by creating a cell using the DisplayMath style, you can do this by pressing command0 in a mac use alt in windows and entering DisplayMath. Enter a+b+c=d. What we want now is to create a gridgo one step down, we can do this by pressing controlreturn. SoIf you did this now you should see a box right below "d", we start withwant a row which contains 3 columns. The first two columns do not require alignment butbox to be below the last one doeswhole expression. So delete that box, select the whole expression and try again. After that enter the following: c=d-a-b. This is what you should see now:

not aligned

To make them become aligned, now we can use the shortcut\[AligmentMarker]. We want them to be aligned along the equal signs we can enter EscamEsc next to place them where we want them just as we would in latex. Finally, do not forget the option Alignment in the column that we want to be alignedequal signs. Now we should see this:

aligned

After you finish with a column, you can create another column by pressing control,. And repeat. Here is a screenshotdisplay of the resultsyour equation from your example:
enter image description hereresult

To addput the piecewise bracket useI used what Rojo has mentioned in his answer. I typed EscpwEsc at the beginning of the equation.

You could also use the AlignmentMaker. They have a tutorial in which they show one example that might help you get things aligned. So, to show how to get the latex sample that you show in your post you can start by using this:

TraditionalForm[
    HoldForm[
        Row[{
            Column[{0, (t - Subscript[x, min])/(Subscript[x, max] - Subscript[x, min]), 1}], 
        ",    ",
        Column[{t <=\[AlignmentMarker] Subscript[x, min], Subscript[x, min] <= t <=\[AlignmentMarker] Subscript[x, max], t > \[AlignmentMarker]Subscript[x, max]}, Alignment -> "\[AlignmentMarker]"]
        }]
    ]
]

The alignment marker is invisible by default. You can set them to be displayed with

SetOptions[$FrontEnd, ShowInvisibleCharacters -> All]

And turn it off with

SetOptions[$FrontEnd, ShowInvisibleCharacters -> None]

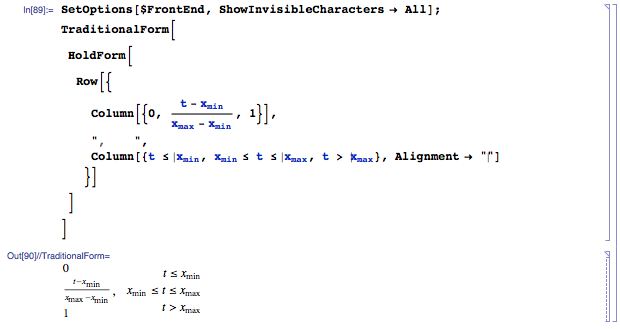
The idea here is to create a grid. So we start with a row which contains 3 columns. The first two columns do not require alignment but the last one does. So we can use the shortcut EscamEsc to place them where we want them just as we would in latex. Finally, do not forget the option Alignment in the column that we want to be aligned.

Here is a screenshot of the results:

enter image description here

To add the piecewise bracket use what Rojo has mentioned in his answer.

You could use the \[AligmentMarker] character. To help you better write equations, lets forget about the DisplayFormula style and lets create our own.

#Set up:#

Let us create the style DisplayMath. In your notebook where you are writing your displayed equation go to Format > Edit Stylesheet.... Here you will create a new cell. Show the expression of the cell by going to Cell > Show Expression or by pressing commandshifte in a mac. Now enter the following in that expression:

Cell[StyleData["DisplayMath"],
    ConversionRules->{
        "TeX" -> {"$$\n", Convert`TeX`BoxesToTeX[#]& , "\n$$"}, 
        "HTML" -> {"$$\n", StringReplace[Convert`TeX`BoxesToTeX[#], {"<" -> " \\lt ", ">" -> " \\gt "}]& , "\n$$\n\n"}
    }, 
    DefaultFormatType->TraditionalForm, 
    TextAlignment->Center, 
    LanguageCategory->"Formula", 
    AutoSpacing->True,
    ScriptLevel->0,
    AutoMultiplicationSymbol->False,
    SingleLetterItalics->True, 
    SpanMaxSize->Infinity,
    CounterIncrements->"DisplayMath",
    FontFamily->"Times",
    FontSize->16, 
    ShowInvisibleCharacters->All, 
    UnderoverscriptBoxOptions->{LimitsPositioning->False}, 
    GridBoxOptions->{
    GridBoxAlignment->{
        "Columns" -> {{"\[AlignmentMarker]"}}, "ColumnsIndexed" -> {}, 
        "Rows" -> {{Baseline}}, "RowsIndexed" -> {}}
    }
]

This is the style that I'm using to display mathematics. Notice the use of ShowInvisibleCharacters, this makes the \[AligmentMarker] to be displayed. If you do not wish for this to be displayed when you print or in a presentation then turn it off when you use another environment. You do so by creating a cell with these contents:

Cell[StyleData["DisplayMath", "Printout"],
    ShowInvisibleCharacters->None
]

The option GridBoxOptions simply say that the grids in this style will be aligned using the \[AlignmentMarker]. Now lets type some math.

#Writing Aligned Equations:#

Start by creating a cell using the DisplayMath style, you can do this by pressing command0 in a mac use alt in windows and entering DisplayMath. Enter a+b+c=d. What we want now is to go one step down, we can do this by pressing controlreturn. If you did this now you should see a box right below "d", we want a box to be below the whole expression. So delete that box, select the whole expression and try again. After that enter the following: c=d-a-b. This is what you should see now:

not aligned

To make them become aligned, now we can use the \[AligmentMarker]. We want them to be aligned along the equal signs we can enter EscamEsc next to the equal signs. Now we should see this:

aligned

After you finish with a column, you can create another column by pressing control,. And repeat. Here is a display of your equation from your example:

result

To put the bracket I used what Rojo mentioned. I typed EscpwEsc at the beginning of the equation.

Source Link
jmlopez
  • 6.5k
  • 4
  • 28
  • 48

You could also use the AlignmentMaker. They have a tutorial in which they show one example that might help you get things aligned. So, to show how to get the latex sample that you show in your post you can start by using this:

TraditionalForm[
    HoldForm[
        Row[{
            Column[{0, (t - Subscript[x, min])/(Subscript[x, max] - Subscript[x, min]), 1}], 
        ",    ",
        Column[{t <=\[AlignmentMarker] Subscript[x, min], Subscript[x, min] <= t <=\[AlignmentMarker] Subscript[x, max], t > \[AlignmentMarker]Subscript[x, max]}, Alignment -> "\[AlignmentMarker]"]
        }]
    ]
]

The alignment marker is invisible by default. You can set them to be displayed with

SetOptions[$FrontEnd, ShowInvisibleCharacters -> All]

And turn it off with

SetOptions[$FrontEnd, ShowInvisibleCharacters -> None]

The idea here is to create a grid. So we start with a row which contains 3 columns. The first two columns do not require alignment but the last one does. So we can use the shortcut EscamEsc to place them where we want them just as we would in latex. Finally, do not forget the option Alignment in the column that we want to be aligned.

Here is a screenshot of the results:

enter image description here

To add the piecewise bracket use what Rojo has mentioned in his answer.